CADLIVE
Ver.2.15
Operation
Manual
2004.03. Kyushu Institute of Technology
CONTENTS
3.1 Installing the
JavaTM 2 Runtime Environment
4.3 Loading the
Existing Network
5.1 Explanation of
Objects on the Network Constructor
5.1.12 Zoom
Magnification Display Box
5.2.2 Positioning
the Reaction
5.2.3 Positioning
the Modifier
5.5.1 Connecting
the Reaction, Modifier and Specie
5.5.2 Connecting
the Gene and Specie
5.5.3 Connecting
the Modifier and Reaction
6.1 Explanation of
Objects on the DataEditor
6.2 Explanation of
Specie Items
6.3 Explanation of
the Reaction Items
Notice:
There
are two kinds of CADLIVE editors: the GUI editor and text editor. Users are
recommended to draw a large-scale biochemical network by using the GUI editor
and to elaborately edit the generated regulator-reaction equations by using the
text editor. The text editor handles the XML file created by the GUI editor,
but the GUI editor cannot read the XML file edited by the text editor.
1 CADLIVE
CADLIVE
is a system for constructing large-scale biological networks (metabolic and
gene regulatory networks) using GUI (Graphic User Interface) and saving them as
regulator reaction equations in a database in the format compatible to a
simulator. It has been developed
by Professor Kurata at the Kyushu Institute of Technology together with staffs
at Mitsui Knowledge Industry Co., Ltd.
There
are two kinds of CADLIVE editors: the GUI editor and text editor. Users are
recommended to draw a large-scale biochemical network by using the GUI editor
and to elaborately edit the generated regulator-reaction equations by using the
text editor. The text editor handles the XML file created by the GUI editor,
but the GUI editor cannot read the XML file edited by the text editor.
2 System Requirements
Hardware Configuration:
CPU :Pentium3
500M Hz or higher
Memory :128MB
or more (256MB or more recommended)
HDD :1Gb
or more recommended
Software Configuration:
Windows 98, NT4.0, 2000, XP
JavaTM 2 Runtime Environment 1.3
3
Installation
3.1 Installing
the JavaTM
2 Runtime Environment
Double-click the j2re-1_3_1_03-win-i.exe on the CD-ROM.
Follow the on-screen instructions to complete the installation process.
Skip this process if JavaTM 2 Runtime Environment or JavaTM 2 Standard Development Kit 1.3 or later is already installed.
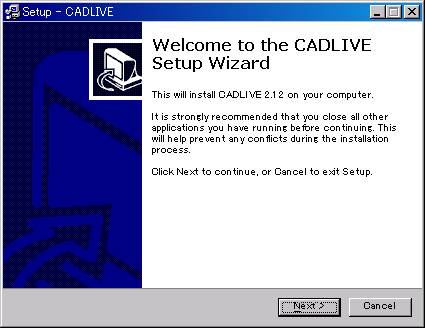
3.2 Installing CADLIVE
Double-click
the setup.exe. icon on the CD-ROM.
Follow the on-screen instructions to install CADLIVE directly below the
C drive.
(Installation will be completed by pressing the NEXT button and Install
button.)
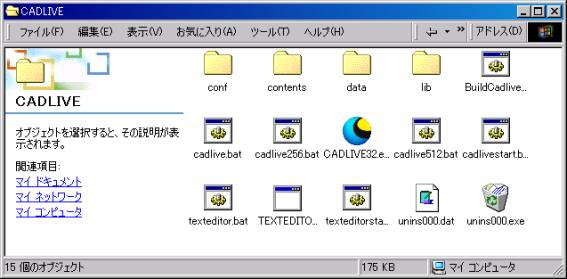
To
uninstall CADLIVE, double-click the unins000.exe icon installed on the
directory. Once CADLIVE is uninstalled, all the existing files as well as the
existing network data will be deleted.
If you need the network data, make sure to save it as backup on another
directory before uninstalling.
4 Start-up
4.1 Start-up of CADLIVE
Make
sure that JavaTM 2 Runtime Environment (1.3) has been installed.
Select
CADLIVE from the Program menu or double-click the "CADLIVE32.exe" on
the directory (C:\CADLIVE) where CADLIVE is installed.
Note
that CADLIVE needs more than 4000 kB memory allocation.
Start-up
Screen

4.2
Creating a New Network
- OpeningDialog box
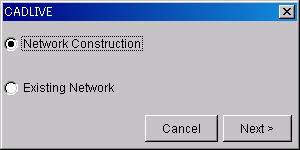
Select "Network Construction."
Click the [Next>] button.
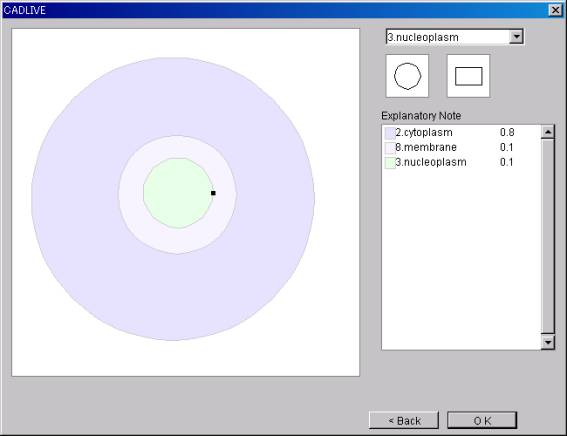
-
Component layout using the Cell Comp Dialog box

Select
Components from the select box for editing cellular components.
*There are nine types of Components: Environment, Cytoplasm,
Nucleoplasm, ER, Mitochondria, Golgi, Chloroplast, Membrane and Others.
*If "Others" is
selected, its name can be edited arbitrarily.
Select the form (circle or
rectangle).
If the panel is clicked, the
object will be placed in the designated form of the designated Component.
*By dragging the object, it can
be moved to a new location.
*By dragging the toggle button on
the object, its size can be changed.
*When two objects are overlapped,
the overlapping object will have priority over the other. The overlapped part
will then be invalid.
* By right-clicking on the object
and selecting Delete, the object will be deleted.
- VolumeDialog
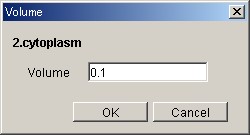
In order to define the Volume of
Compartment, select the specified Compartment and click the Volume on the
right-click menu. Put an appropriate value in the Volume box and click the [OK]
Button.
* Regarding Compartment whose name is the same, setting the value of
Volume reflects all the values of Compartment Volume.
After finishing placing all objects, click the [OK] button.
4.3
Loading the Existing Network
- OpeningDialog
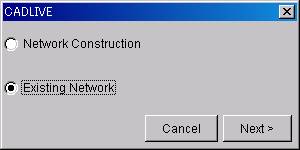
Select the Existing Network
Click the [Next>] button.
- OpenNetWorkDialog
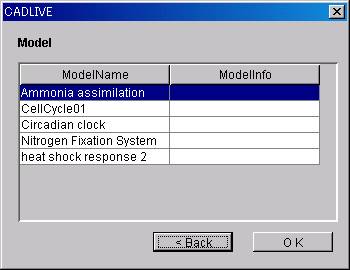
ModelName and ModelInfo will be
displayed in a list.
Select the ModelName of the
network to load.
Click the OK button.
5 Network Constructor
5.1
Explanation of Objects on the Network Constructor
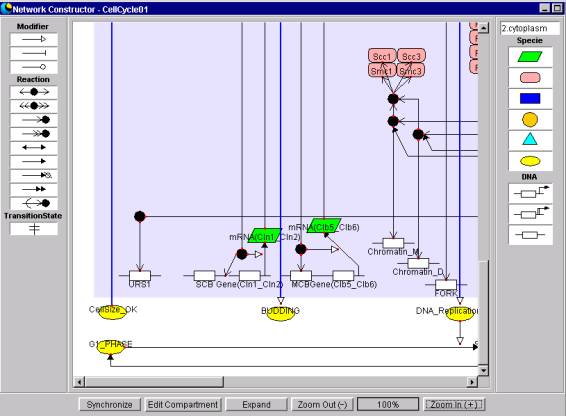
5.1.1 Panel
This is the field used to position
and draw Symbols. One sees the
Components that have been selected from the Component Dialog box.
5.1.2 Specie Palette
This palette
is used to position RNA, protein, metabolite, environmental factor, ion signal,
or others.
5.1.3 Reaction Palette
This palette
is used to position binding, binding_with_stoichiometric_changes,
homo_association_or_modification,
homo_association_or_modification_with_stoichiometric_changes,
reversible_conversion,
irreversible_conversion, transitionState, degradation,
transport, or translation.
5.1.4 Modifier Palette
This palette
is used to position activator, inhibitor,or enzyme.
5.1.5 Gene Palette
This palette
is used to position transcription, protein_synthesis, or regulatory regions of
a gene (enhancer, promoter, other).
5.1.6 Compartment Display Box
This box
displays the Component that is selected in the panel.
5.1.7 Synchronize Button
Clicking this
button will synchronize data on the Network Constructor with the other Windows.
5.1.8 Edit Compartment Button
Clicking this button will display the Window to
reedit Compartment.
5.1.9 Expand Button
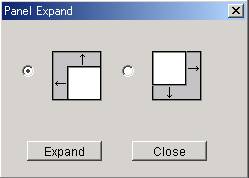
Clicking this
button will expand the drawing area of the panel in the upper left or lower
right direction. Since the area of
the environment is enlarged, one can change the size of area of cellular
compartments of interest.
5.1.10 Zoom Out Button
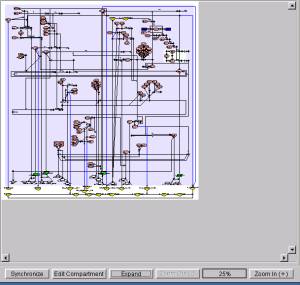
Clicking this
button will reduce the viewing area of the panel (Individual Symbols will be
reduced accordingly.) The area can
be zoomed out up to 25%.
5.1.11 Zoom In Button
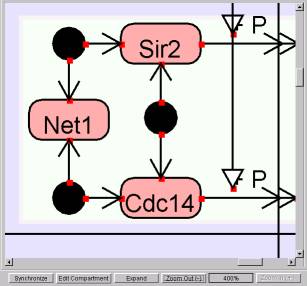
Clicking this
button will expand the viewing area of the panel (Individual Symbols will be
enlarged accordingly.) The area
can be zoomed in up to 400%.
5.1.12 Zoom Magnification Display Box
The box displays the current zoom
magnification.
5.2 Positioning
the Symbol
5.2.1
Positioning the Specie
The
Specie is an element that expresses a biomolecule and can become a node of biological
networks.
-
Positioning the Specie
Click any Specie to be positioned
on the Specie palette, making it "selected."
Click the Specie once again at the location that you want to position it
in the panel. The Specie will be positioned in the panel.
The Specie data that
is set in the spreadsheet of the Data Editor is displayed at the same time as
the Specie is placed on the panel.

RNA Denotes
RNA
protein Denotes
Protein
metabolite Denotes
Metabolite
environmental_factor Denotes
Environmental Factor
ion_signal Denotes
Ion Signal
others Denotes
Others
"DNA" denotes DNA.
*
Use Gene (5.2.4) for layout.
"complex" denotes a complex.
* Position Complex using binding,
homo_association_or_modification.
(5.2.2)
"modified" denotes a
modified substance.
*Position
Modified substance, use binding_with_stoichiometric_changes,
homo_association_or_modification_with_stoichiometric_changes
(5.2.2)
"text_option" denotes text data
necessary for detailed reactions.
*
Position text_option using Option (5.2.7) of Reaction.
"small_molecule" denotes small compound.
*
Position small_molecule_option using Option (5.2.7) of Reaction.
5.2.2
Positioning the Reaction
Reactions
are the elements that are described as lines of biological networks, denoting
various biochemical reactions and formations of complexes.
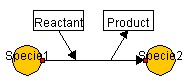
- Positioning the Reaction
Click any Reaction to be
positioned on the Reaction palette, making it "selected."
Click the Reaction one more time at the location where you want to
position it on the panel. The reaction is placed on the panel. By dragging
either node of the reaction onto the Symbol of the Specie, reaction can be
connected with the specie. Both ends of the arrows turn red in color when the
specie is successfully connected to the reaction. The reaction data appear in
the spreadsheet of the Data Editor in the timing of connecting the reaction
arrow to the Specie that satisfies the reaction equation.
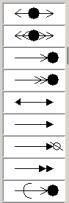 binding denotes
the reaction that forms a complex.
binding denotes
the reaction that forms a complex.
binding_with_stoichiometric_changes
denotes the reaction that forms a complex
with
a chemical process (stoichiometric).
homo_association_or_modification
denotes the association of identical molecules.
homo_ association_or_modification
_with_stoichiometric_changes
denotes
the modification of small molecules.
reversible_conversion denotes reversible conversion.
irreversible_conversion denotes irreversible
conversion.
degradation
denotes degradation reaction.
translation
denotes translation reaction.
transport
denotes transport reaction.
*If
Transport is used, a Specie identical to its reactant will automatically be
registered in the Compartment where the specie is transported.
elimination
denotes eliminating a molecule from the complex.
elimination_with_stoichiometric_changes
denotes eliminating a molecule from the
modified molecule.
* Use Option (5.2.7) for elimination and
elimination_with_stoichiometric_changes.
reversible_conversion_regarding_multicompornent
denotes reversible conversion regarding multiple species.
irreversible_conversion_regarding_multicompornent denotes irreversible conversion
regarding
multiple species
*Position
reversible_conversion_regarding_multicompornent and
irreversible_conversion_regarding_multicompornent using the Symbol of
TransitionState.
Click the Transition State on the
Reaction palette, making it "selected."

Click
it once again at the location that you want to position it in the panel.
Transition
State will be positioned in the panel.
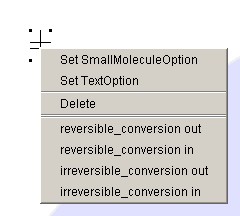
If
Transition State is right-clicked, Set SmallMoleculeOption, Set TextOption,
Delete, reversible-conversion out, reversible-conversion in,
irreversible-conversion out, irreversible-conversion in will be
displayed.
Thus, when creating reversible_conversion_regarding_multicompornent,
use reversible-conversion out and reversible-conversion in,
and when creating irreversible_conversion_regarding_multicompornent,
use irreversible-conversion out and irreversible-conversion in.
transcription
protein_synthesis
* Position transcription and protein_synthesis using Gene (5.2.4).
5.2.3 Positioning the Modifier
The
Modifier is an enzyme that catalyzes reaction, or a regulator that activates or
inhibits a reaction. Regulators can also express the reaction for activation or
inhibition of the Specie or another Modifier.
- Positioning the Modifier
Click
Modifier on the Modifier palette, making it "selected."
Click it once again at the location that you want to position it in the
panel. Modifier will be positioned in the panel.
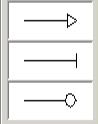
activation denotes
Activation
inhibition denotes
Inhibition
enzyme denotes
Enzyme Reaction
*
Enzyme can be connected only to protein, complex, modified
5.2.4 Positioning
the Gene
Functions
of Gene are Specie elements such as DNA and transcription, as well as reaction
elements such as protein synthesis.
- Positioning the Gene
Click Gene on the DNA palette,
making it "selected."
Click it once again at the
location that you want to position it in the panel. Gene will be positioned in
the panel.
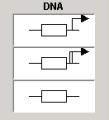 transcription Collectively
denotes the coding region
transcription Collectively
denotes the coding region
and transcription reaction
protein_synthesis Collectively denotes the coding
region,
transcription and translation reaction.
other_gene denotes
the regulatory region
(enhancer
or promoter).
* Transcription is connected only to RNA.
* "protein_synthesis" is connected only to protein. When using
protein_synthesis, RNA will be registered as Specie while transcription and
translation will be registered as Reaction.
5.2.5
Positioning the Option
- Positioning the elimination, elimination
_with_stoichiometric_changes
Right-click homo_association_or_modification or
homo_association_or_modification_with_stoichiometric_changes, and
select SetElimination or SetEliminationWithStoichiometicChanges.
- Positioning the Text Option
Right-click the arrow for Reaction (homo_association_or_modification,
homo_association_or_modification_with_stoichiometric_changes,
elimination,
elimination_with_stoichiometric_changes,reversible_conversion,
irreversible_conversion, reversible_conversion_regarding_multi_component,
or
irreversible_conversion_regarding_multi_component)
to open Text Option and select Set Text Option.

Input Option data by following
the Text Option Dialog box.
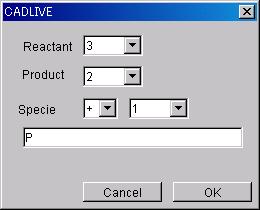
*Input the number of Species on
the Reactant side of Reaction to which Text Option will be added (can be
selected from numbers from 2 to 10, or Poly, Hyper or Hypo).
*Input the number of Specie on
the Product side of Reaction to which Text Option will be added (can be
selected from numbers from 2 to 10, or Poly, Hyper or Hypo).
*Input the Specie data to which
Text Option will be added.
If
the data is "+," it will be registered in Reactant.
If
it is "-," it will be registered in Product.
However,
it will always be positive in Homo_association_or_modification or
Homo_association_or_modification
and it will always be negative in
Elimination,
Elimination_with_stoichiometric_changes
The number of Text Option of Specie can be selected from numbers between
2 and 10, or Poly, Hyper or Hypo.
The name input in the lower box will be registered as Specie Name.
- Layout of Small Molecule Option
Right-click
Reaction that can position SmallMoleculeOption
and
select "Set SmallMoleculeOption."
In order to add Option to ReversibleConversion, IrreversibleConversion,
reversible_conversion_regarding_multi_component
or
irreversible_conversion_regarding_multi_component, the specie name
before and after the reaction can be edited. The default is Reactant and
Product as follows.
To set up SmallMoleculeOption regarding
Homo_association_or_modification_with_stoichiometric_changes, select
Reactant
and Product from the dialog box.
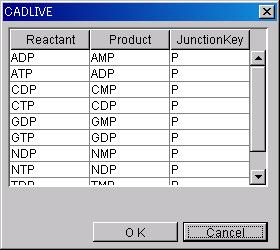
The
substance in JunctionKey will be added to Modified.
-
Positioning the Option Transport
By
right-clicking on the Transport and selecting SetOptionTransport, users are
able to draw the reversed transport.
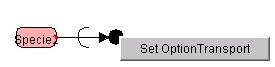
Since
Option transport is able to connect not only to the transported Reactant but
also to the related Specie, users are able to draw the transportation between
multiple compartments.
5.3 Moving the Symbol
5.3.1 Moving
the Specie
By dragging the Symbol viewing area of the Specie , it can be
moved.
However, TextOption and SmallMoleculeOption cannot move individually.
They
move according to the movement of the added Reaction.
5.3.2 Moving
the Reaction
By dragging one end node of Reaction, one can rotate, expand and
contract Reaction using the opposite node as an axis. However, TransitionState will move in line with the
Specie. The Reaction connected to
the Specie moves in accordance with the movement of its connecting end of the
Specie.
5.3.3 Moving
the Modifier
By dragging one end node of the
Modifier, one can rotate, expand or contract the Modifier using the other end
node as an axis. However,
TransitionState will be moved in line with the Modifier. The Modifier connected
to Specie, Reaction or another Modifier move in accordance with the movement of
its connecting end of the Symbol.
5.3.4 Moving
the Gene
By dragging the Symbol viewing area of the Gene, it can be moved. By
dragging the one end node of the Gene, one can rotate, expand and contract
Reaction using the Specie as an axis. The Reaction area of the Gene connected
to Specie can move following the movement of its connecting end of the Specie.
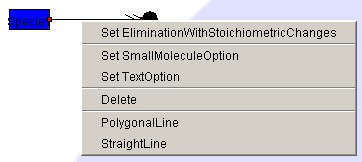
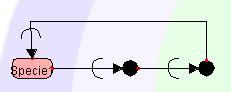
5.3.5
Bending the Symbol
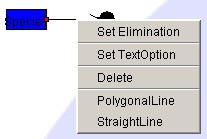
To draw a polygonal line,
right-click the line segment you want to change, and select
"PolygonalLine" from the Popup menu.
A handle (Red Squares) will appear in the center of the designated line. By dragging the handle, a polygonal line can be drawn. A polygonal line can be bent up to four times.
To make the polygonal line back to a straight line, right-click the line
segment and select StraightLine from the Popup menu.
If there is Modifier attached to that line segment, right-click to draw
a polygonal line on the Reactant side.
Modifier will move towards the Product side. Likewise, if one draws a polygonal line by right-clicking on
the Product side, Modifier will move towards the Reactant side.
![]()
![]()
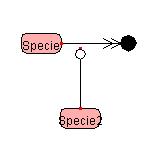
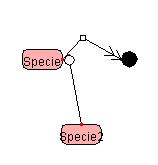
Right-clicking
on the Reactant side Right-clicking
on the Product side
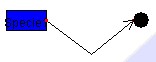
5.4 Deleting the Symbol
5.4.1 Deleting the Specie
![]()
By right-clicking on the Symbol viewing area of the Specie and selecting
"Delete," the Specie can be deleted. To delete TextOption or SmallMoleculeOption, right-click the
Reaction viewing area where Option has been positioned, and select
"DeleteTextOption" or "DeleteSmallMoleculeOption." Also, if one deletes the Reaction where
Option has been positioned, Option will be deleted as well.
5.4.2 Deleting the Reaction
By right-clicking on the Reaction and selecting "Delete,"
Reaction can be deleted. If both
end nodes are connected, Reaction can be deleted by right-clicking the line and
selecting "Delete."
5.4.3 Deleting the Modifier

By right-clicking on the Modifier and selecting "Delete,"
Reaction can be deleted. If both
end nodes are connected, Modifier can be deleted by right-clicking the line and
selecting "Delete."
5.4.4 Deleting the Gene
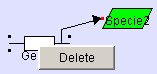
By right-clicking the Specie
viewing area of Gene and selecting "Delete," Gene can
be
deleted. However, one cannot do so
by right-clicking the Reaction area.
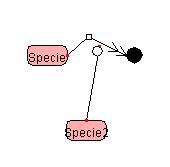
5.5 Connecting
the Symbol
5.5.1 Connecting the Reaction,
Modifier and Specie
By dragging the either node of the Reaction and Modifier onto the Symbol
of the Specie, Reaction and Modifier can be connected with the Specie.
Both ends of the arrows turn red in color when the Specie is successfully
connected to the Reaction.
5.5.2 Connecting the Gene
and Specie
By dragging the end node of Transcription and Protein_synthsis onto the
Symbol of Specie, DNA (Transcription, Protein_synthsis) and Specie can be
connected.
5.5.3 Connecting the Modifier
and Reaction
By dragging the tip of Modifier
onto the Reaction or another Modifier 's line, Modifier, Reaction, or another
Modifier can be connected.
6
Data Editor
6.1 Explanation
of Objects on the DataEditor
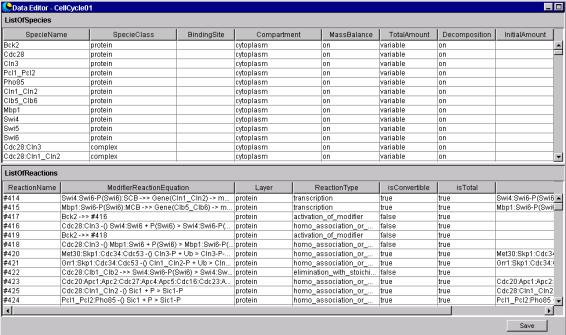
6.1.1 Specie Spreadsheet
This is the spreadsheet used to
display, input and edit attribute data of the Specie and BlackBox positioned by
NetworkConstructor. Before inputting texts, make sure that the input cell is
"selected." After
inputting text, press the return key to define it.
6.1.2
Reaction Spreadsheet
This is the spreadsheet to display, input and edit attribute data of
Reaction positioned by NetworkConstructor. Before inputting text, make sure that the cell to input data
in is "selected." After
inputting text, press the return key to define it.
6.1.3 Save
Button
Network data created and edited
by NetworkConstructor or DateEditor will be saved in the model folder on the
XML database (C: \CADLIVE\data)
It is the same function as the
Save in the File menu.
6.2 Explanation
of Specie Items
- SpecieName
The Specie positioned will be
given as a temporary name in the system, which can be edited by DataEditor.
*The name connecting the SpecieName with colons like "A:B:" is
given as a Complex; the name connecting SpecieName with hyphens like
"A-B-" is given as a Modified.
Such generated Specie name cannot be changed. However, the name of RNA
generated by ProteinSynthesis can be edited.
-
SpecieClass
Material
denotes material attributes of the Specie generated by
NetworkConstructor.
DNA
RNA
protein
metabolite
environmental_factor
ion_signal
complex
modifier_complex (Enzyme-substrate complex: Specie that is
automatically
created by the system, cannot be edited by users)
modified (Modified Substance)
text_option (Specie
Generated by a text_option)
small_molecule (Specie Generated by a small_molecule_option)
others
-
BindingSite
It selects the classification of
the DNAs that neither encode any protein nor RNAs as a material attribute.
enhancer :
activating factor binding site of DNAs
promoter :
inhibiting factor binding site of DNAs
other :
non-specific binding sites of DNAs
The default is other. Depending
on the selection box, the displayed content can be changed.
- Compartment
Component
denotes location attributes of the Specie generated by
NetworkConstructor.NetworkConstructor.
environment
cytoplasm
nucleoplasm
ER
mitochondria
golgi
chloroplast
membrane
other
- MassBalance
Select
MassBalacne attribute in the ListOfSpecies.
off :
It does not require any mass balance equation.
on :
It requires a mass balance equation.
When the SpecieClass is RNA, Protein, Metabolite, Complex or Modified,
the default will display "on," if not, the default will display
"off." The viewing
content can be changed using the selection box.
- TotalAmount
Select
TotalAmount attribute in the ListOfSpecies.
constant :
constant in a differential equation
variable :
variable in a differential equation
If the SpecieClass is DNA,
metabolite, environmentl_factor, ion_sygnal,
small_molecule and other, the default “constant” will appear. If not, the default
“variable” will appear.
Depending on the selection box, the displayed content
can be changed.
- Decomposition
Select
Decomposition attribute in the ListOfSpecies.
on :
generates the decomposition term in a mathematical model
off :
does not generate the decomposition term in a mathematical model
When the SpecieClass is RNA, Protein, Metabolite, Complex or Modified,
the default will display "on," if not, the default will display
"off." The viewing
content can be changed using the selection box.
- InitialAmount
Input the initial value of species.
6.3 Explanation
of the Reaction Items
- ReactionName
The
Reaction name is displayed that is attached by the symbol “#” preceding Reaction ID.
- ModifierReactionEquation
The regulator reaction equations corresponding to the map are
displayed. (They appear in the
order of Modifier Specie, ModifierType, ReactantReaction Specie, Reaction, and
ProductReaction Specie.)
-
Layer
Select
the reaction layer.
metabolic :
reaction at the metabolic layer
protein :
reaction at the protein interaction layer
The
default is given according to ReactioType.
The
viewing content can be modified using the selection box.
-
ReactionType
Reaction
attributes generated by NetworkConstructor are displayed.
binding
binding_with_stoichiometric_changes
homo_association_or_modification
homo_association_or_modification_with_stoichiometric_changes
elimination
elimination_with_stoichiometric_changes
reversible_conversion
irreversible_conversion
reversible_conversion_regarding_multicompornent
irreversible_conversion_regarding_multicompornent
transport
option_transport
transcription
translation
degradation
activation_of_specie
inhibition_of_specie
activation_of_modifier
inhibition_of_ modifier
-
isConvertible
Select
if a simulator converts the reaction into mathematical equations or not.
true :
It is convertible.
false :
It is not convertible.
The default is true.
Depending on the selection box, the displayed content can be
changed.
Note that the reaction that is not able to generate any regulator
reaction equation is “false” and it cannot be changed by users.
- isTotal
Select the method for calculation of modifier by a simulator.
true :
the modifier is the Total amount
false :
the modifier is not the Total amount
The default is true. Depending on the selection box, the
displayed content can be changed.
-
ChemicalReactionEquation
Displays
chemical reaction equations of the Reaction.
The reaction whose attribue of "isConvertible" is “false” does
not create any ChemicalReactionEquation.
7 Explanation of Menu Items
7.1 File Menu

7.1.1 New
Start the NewDialog box.
Positioning
the Component in the dialog box. (4.2)
7.1.2 Open
Start the OpenDialog box.
Loading
the Existing Network Data in the dialog box. (4.3)
7.1.3 Save
Save the network data created and
edited by NetworkConstructor or DateEditor on XML. If the network is newly created, it will be always saved as
"SaveAs."
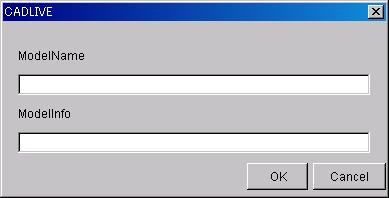
7.1.4 SaveAs
Network
data can be saved as ModelName.
The
input content is ModelName and ModelInfo as follows.
7.1.5 Import
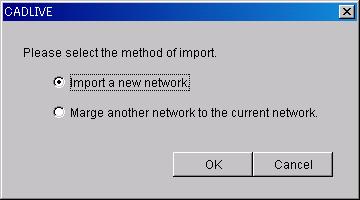
Load the XML file that is created by another
launched CADLIVE by selecting from dialog.
- Important a new network : a new XML file will be imported.
- Marge another network to the current
network : the XML file designated for the currently-edited network will be
added.
7.1.6 Export
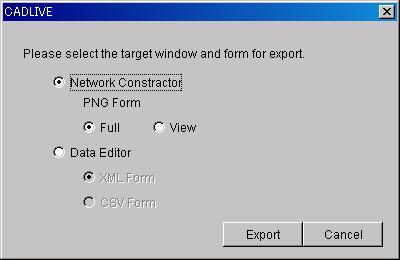
The NetworkConstructor panel will be exported
as a PNG image.
Full : The whole panel of NetworkConstructor
will be exported as a PNG image.
View : The panel area of NetworkConstructor
will be exported as a PNG image.
Specie data and Reaction data of the network
viewed in DataEditor will be exported as a PNG image.
XML Form : will be saved in the XML format.
CSV Form : will be saved in the CSV format (comma-delimited text format)
7.1.7 Print
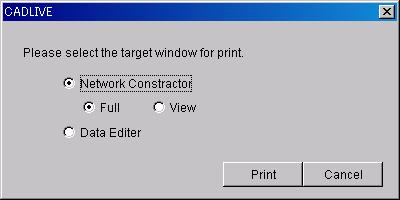
-
Printing the NetworkConstructor screen
Full : The whole panel area of
NetworkConstructor will be printed on one page.
View : The panel viewing area of
NetworkConstructor will be printed on one page.
- Printing the DataEditor screen
The spreadsheet of DataEditor
will be printed.
7.1.8 Search
Press
the Search button on SearchDataEditor to display the Search Dialog box.


- ModelName
Select
the ModelName to search.
-
SpecieClass
Select the SpeciesName of species
to search.
With
no input data all SpeciesClass are target [/object].
- SearchTerm
Up to 3
SearchTerms can be input to search.
- And/Or Radio Button
Select whether the character line input in SearchTerm will be searched
on the "And" or "Or" condition.
- Search Button
Search the Reaction and Specie applicable to the conditions input from
XML networks and display them in spreadsheets of SearchedReaction and Searched
Specie.
7.1.9 Exit
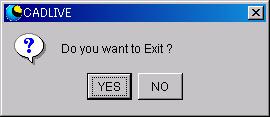
You are exiting CADLIVE.
7.2 Edit Menu
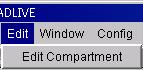
7.2.1
EditCompartment

The Window is displayed to
reedit the Compartment.
7.3 Window Menu
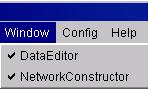
7.3.1 DataEditor
When the DataEditor screen is
visible, the menu is set to "Invisible." When it is invisible, it is set to "Visible." The check mark is displayed when the
screen is visible.
7.3.2
NetworkConstructor
When the NetworkConstructor
screen is visible, the menu is set to "Invisible." When it is invisible, it is set to
"Visible." The check
mark is displayed when the screen is visible.
7.4 Config Menu
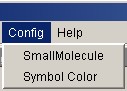
7.4.1
SmallMolecule
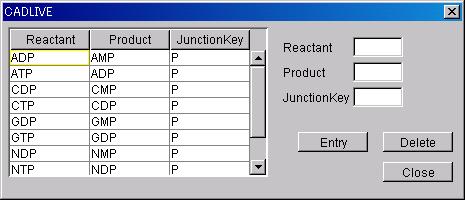
Configure
Specie and JunctionKey, which are viewed when SmallMoleculeOption is added to
the homo_association_wih_stoichimetric_change reaction.
-
Configuration
Input a character line in
Reactant, Product and JunctionKey, and press the Entry button.
-
Deletion
After selecting the viewed Specie
and JunctionKey, press the Delete button.
7.4.2
SymbolColor
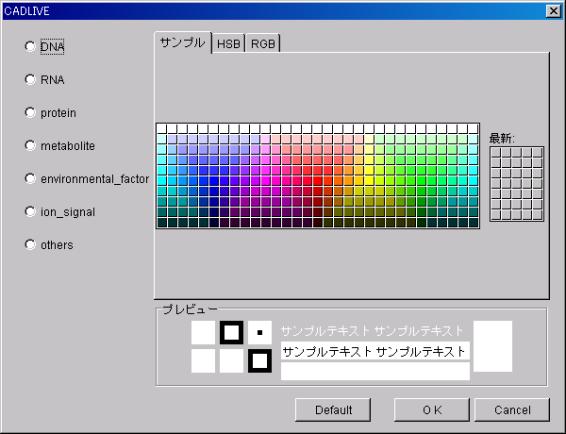
The
viewing color of the Specie can be changed.
- Configuration
After selecting the Specie to configure on
the left, select the color from the right and define it by pressing OK. A plural number of Species can be
configured simultaneously.
To set color as the initial color, press the
Default button after selecting the Specie on the left.
7.5 Help Menu
7.5.1 About
CADLIVE
The version information of
CADLIVE is displayed.